In apparel manufacturing, a “good-looking” print can still fail quality for reasons that are subtle but costly: a logo 3–5 mm off-center, slight color drift between batches, a smeared edge that becomes obvious after wash, or missing micro-elements in a design. Manual inspection struggles because it’s slow, subjective, and inconsistent under different lighting and shift conditions.

A camera-based vision system paired with an AI inspection platform like Intelgic Live Vision AI 2.0 turns this into a repeatable, measurable, and auditable quality gate—checking design correctness, logo position, print quality, and color compliance on every piece.
What the automated apparel inspection system looks like
Imaging hardware (Vision station)
- Industrial camera (area-scan) mounted overhead or angled
- Controlled lighting to remove shadows and glare
- Fixture / inspection table or conveyor to keep garments consistently placed
- Optional presence sensor / trigger button / foot pedal
Edge compute
- GPU/industrial PC to run inference and manage inspection flo
- Connectivity to HMI monitor, plant network, and optional cloud dashboard
Live Vision AI 2.0 software
- Recipe-based inspection setup
- Reference design management
- Model training / fine-tuning tools
- Inspection runtime + decision logic
- Audit logs, images, defect tagging, reporting
Output & integration
- Pass/Fail display
- Alerts / stack light / buzzer
- Optional MES/ERP integration via APIs
- Quality reports by shift, style, operator, lot, supplier
Where vision + AI helps in apparel print inspection
Design Validation
"Is this the correct artwork?"
This ensures the printed design matches the correct style/SKU reference.
- Wrong print loaded for the style
- Logo placement and orientation
- Mirrored / rotated print
- Missing layers (e.g., missing slogan text, missing icon)
- Wrong variant of the same design (very common with similar SKUs)
How it’s done
- The software stores a golden reference per SKU/design variant.
- AI-based matching validates overall design similarity while tolerating fabric texture and minor wrinkles.
- Optional OCR reads text in the print and verifies spelling/content.
- Decision: pass if within tolerance; fail with measured deviation
Logo position & alignment
"Is it placed correctly?"
This is one of the highest-value checks because position errors are frequent and hard to judge consistently.
Common position defects
- Logo shifted left/right/up/down beyond tolerance
- Tilt/rotation error (logo not level)
- Logo too close to seam/collar/placket
- Wrong placement zone (chest vs sleeve vs back)
- Misalignment between multiple print elements (e.g., left chest logo vs center graphic)
How it’s done (practical approach)
- Define anchor points: collar line, shoulder seam reference, garment boundary, or fixture edges.
- Detect landmarks: AI detects the garment outline and key points (neckline, sleeve boundary, placket line).
- Measure offsets: the logo’s bounding shape is measured against the anchors.
- Decision: pass if within tolerance; fail with measured deviation shown on-screen.
This converts “looks slightly off” into measured, enforceable criteria.
Print quality inspection
"Is the print sharp and complete?"
This focuses on print integrity and defects that may not be obvious at speed.
Typical print-quality defects
- Smudges / ink bleeding
- Broken strokes / missing dots (especially in fine text)
- Pinholes / incomplete fill in solid areas
- Ghosting/double print (registration shift)
- Edge jaggedness or rough boundaries
- Foreign marks (stains, unwanted ink spots)
- Cracks (for heat transfer / older screens), peeling signs
- Banding (common in DTG/inkjet)
How it’s done
- A defect detection model is trained on real defect images from your line.
- The software learns the difference between acceptable fabric texture and true print defects.
- The inspection highlights defect regions and classifies them by type (optional), and logs them for analytics.
Color validation
"Are colors within spec?"
Color errors are frequent due to ink variation, curing temperature drift, or substrate differences.
Common color defects
- Shade mismatch (brand color drift)
- Wrong color used (variant mix-up)
- Uneven color density / patchiness
- Over-saturation or under-print
- Color bleeding into adjacent regions
- Gradient/halftone inconsistency
How it’s done (recommended method)
- The station uses controlled lighting to make color measurement stable..
- For each critical color region, the system compares the measured color against a reference using a tolerance strategy:
- Channel-based thresholds (RGB/HSV) for simpler cases
- Or perceptual color difference (more robust) when you need brand-accurate comparisons
- The recipe can define:
- Color ROIs (regions of interest)
- Acceptable tolerance bands per color
- Special handling for textured fabric or melange
Step-by-step inspection workflow (how it runs on the floor)
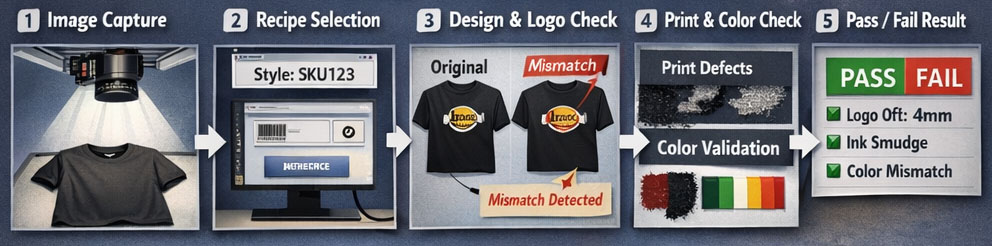
Trigger & image capture
- Operator places garment on fixture/table (or garment passes on conveyor)
- Sensor triggers camera OR operator presses a trigger
- Lighting strobes (if needed) to freeze motion and reduce blur
- Camera captures a standardized image
Recipe Selection
Live Vision AI 2.0 selects the right inspection recipe using one of:
- Manual selection (style/SKU dropdown)
- Barcode/QR scan on bundle tag
- Production line order from MES
- Automatic recognition based on design signature
Pre-processing & normalization
The software compensates for:
- Small placement offsets using alignment algorithms
- Minor wrinkles by focusing on key print regions
- Background variation by using consistent fixture and segmentation
Multi-check inspection (combined logic)
The inspection usually runs as a pipeline:
- Garment detection + boundary alignment
- Design verification (correct artwork)
- Logo position measurement
- Print quality defect detection
- Color validation (per defined ROIs)
- Final pass/fail decision with reason codes
Result + traceability
- On-screen view shows:
- Pass/Fail
- Measurements (e.g., logo shift in mm, rotation in degrees)
- Defect overlays and severity
- Color region comparison result
- Image(s)
- Defect metadata
- Timestamp, operator/line, SKU, batch
- Audit trail for QA and customer claim
How Live Vision AI 2.0 is Configured for Apparel Inspection
Recipe-based Setup
For each garment style/SKU:
- Define inspection zones: chest logo ROI, sleeve logo ROI, back print ROI, etc.
- Define anchor references and tolerances for position checks
- Define color ROIs and tolerance limits
- Define accept/reject criteria (critical vs minor defects)
AI Training & Fine-tuning
Baseline Model
Start with a baseline model for defect detection / classification
Data Collection
Collect samples from your real production (good + defective)
Labeling
Label defects in the built-in dataset builder (boxes/polygons)
Fine-tuning
Fine-tune model to your fabric types, inks, and printing method
Deployment & Continuous Improvement
Continuous Learning Loop
As new defects appear, add them to the dataset
Model Updates
Re-train and push updated models
False Positive Reduction
Track false positives and reduce them by targeted retraining and ROI refinement
Key Engineering Considerations for Accurate Inspection
Lighting is Everything
- Diffused lighting reduces fabric texture artifacts
- Stable lighting is essential for color checks
- Use fixed geometry to avoid day-to-day drift
Fixturing and Placement Control
- Simple alignment guides can dramatically improve repeatability
- If on conveyor: ensure consistent belt color/background and stable garment presentation
Camera Resolution and Field of View
- Choose resolution so smallest defect of interest is visible (text clarity, fine lines)
- Avoid too wide FOV if you need micro-defect detection—use closer imaging or multiple cameras if needed
Tolerance Strategy
- Position checks should be measured in mm/deg (objective)
- Color tolerances should be set per brand needs and fabric variability
- Print defect thresholds should consider wash durability and customer acceptance
Typical outputs & analytics you can generate
Typical outputs & analytics you can generate
- Defect rates by line, shift, operator, SKU
- Top defect categories (smudge, missing print, color drift, misalignment)
- Heatmaps showing where defects occur most (e.g., left chest zone)
- Batch-to-batch color trend monitoring
- Traceability for each garment or bundle
A camera-based vision station combined with Live Vision AI 2.0 enables automated, consistent, and measurable apparel print inspection:
- Design verification to prevent wrong artwork/SKU mix-ups
- Logo position & alignment checks with mm/degree tolerances
- Print quality defect detection for smudges, missing print, ghosting, pinholes, etc.
- Color compliance checks to detect shade drift, wrong ink, uneven density