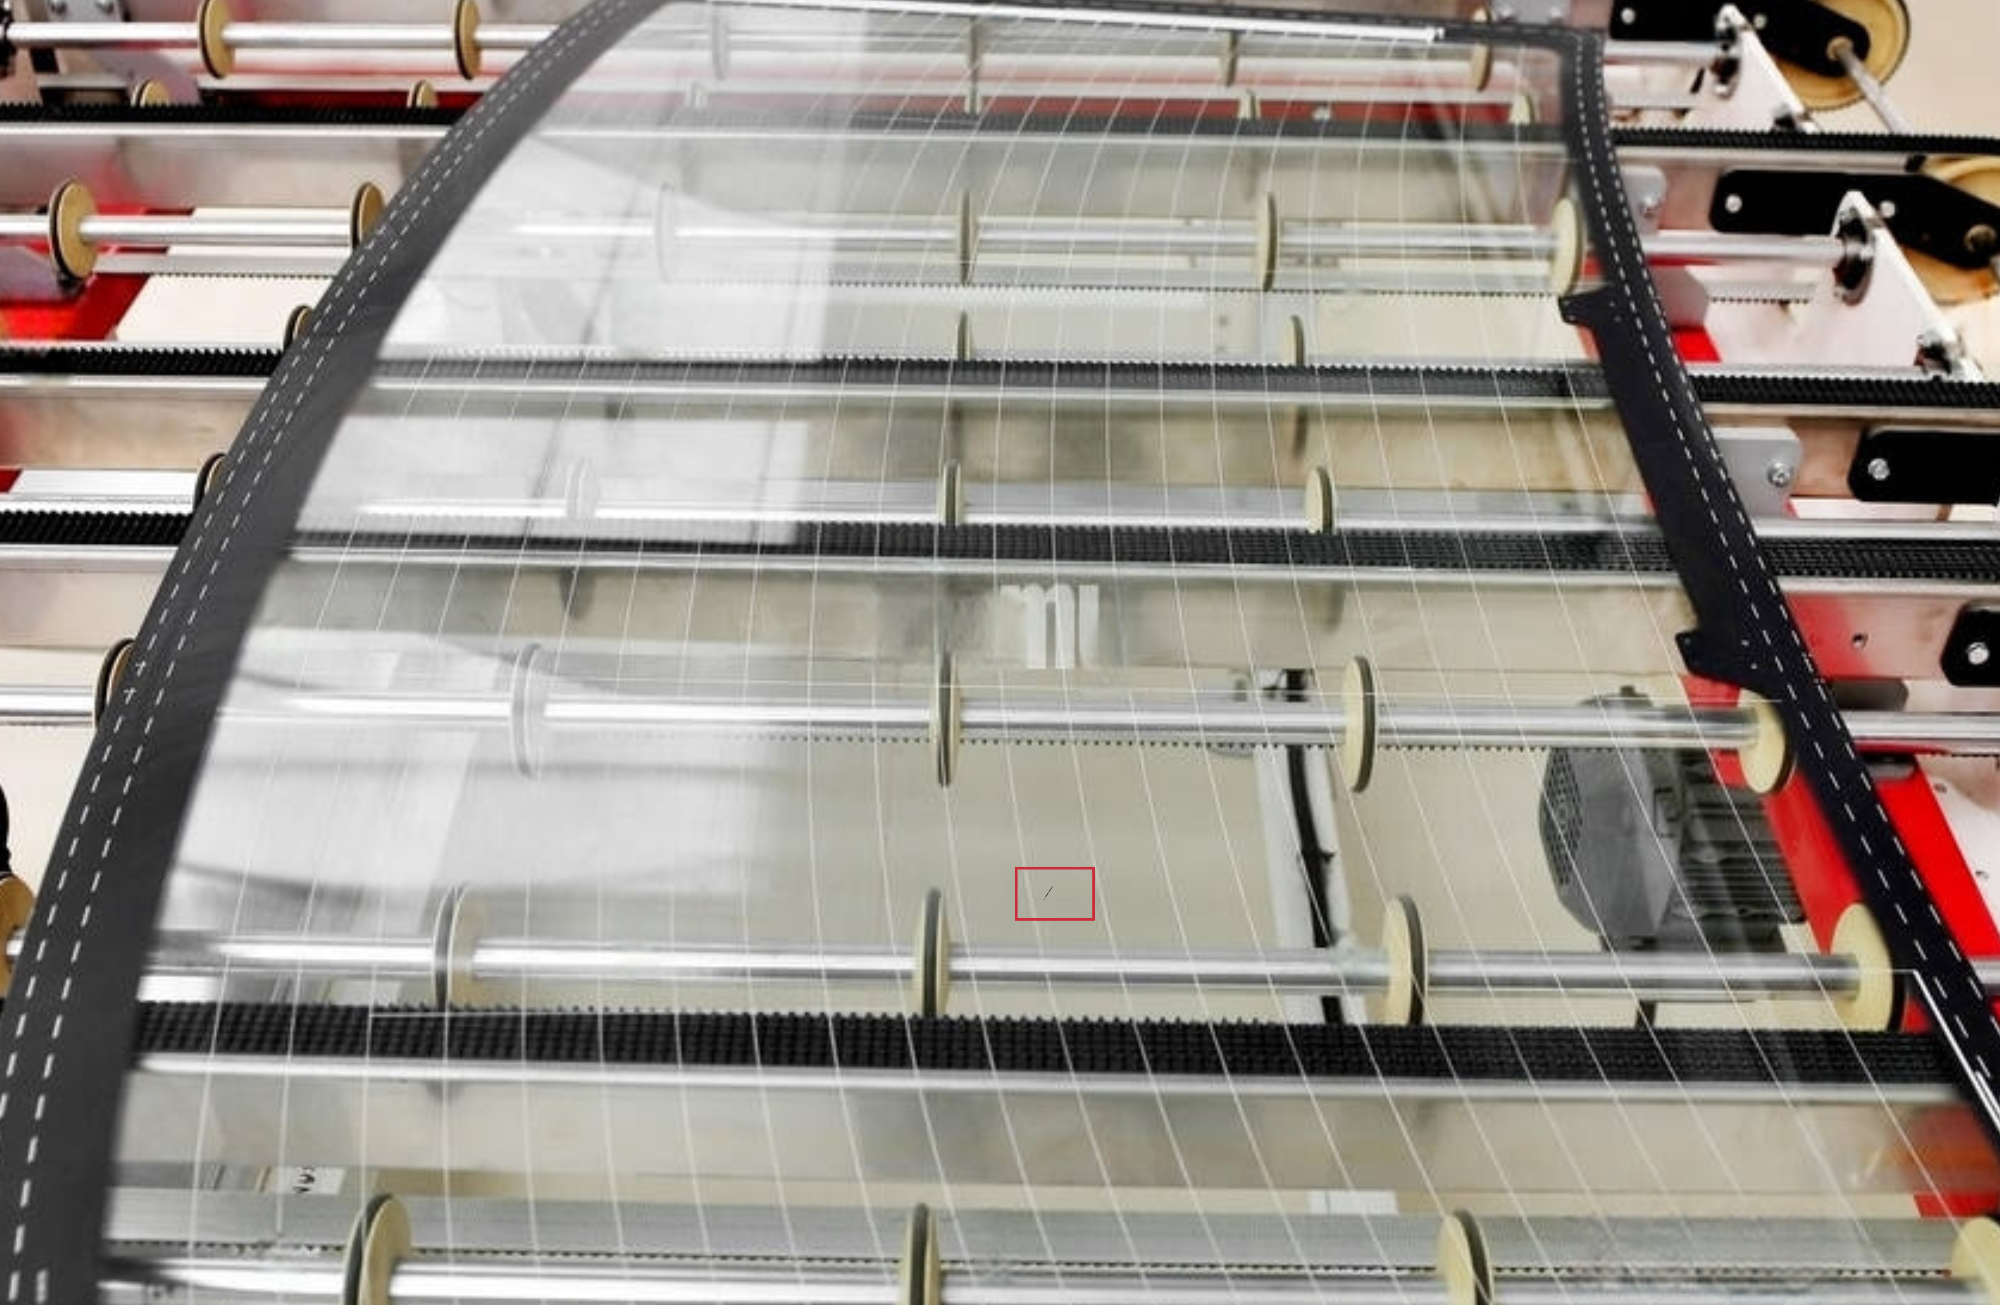
Reflective and Transparent Glass Inspection Automation with Machine Vision AOI
Published on: Apr 09, 2025

Written by: Content team, Intelgic
Reflective and Transparent Glass Inspection Automation with Machine Vision AOI
In industries where aesthetics, clarity, and structural integrity are non-negotiable—such as automotive, construction, electronics, and solar—reflective and transparent glass plays a critical role. However, inspecting these glass surfaces presents a significant challenge due to their unique optical properties. Transparency allows defects to go unnoticed, while reflectivity often creates glare and false positives, making traditional inspection methods both inefficient and unreliable.
As manufacturers strive to deliver flawless products at higher speeds, the limitations of manual inspection become increasingly apparent. This is where automated optical inspection (AOI), advanced imaging systems, and intelligent lighting, steps in. Technologies like area scan and line scan cameras, when paired with shadowless lighting, have revolutionized the way defects are detected on difficult surfaces.
At the forefront of this transformation is Intelgic’s Live Vision software, which combines cutting-edge AI with robust imaging capabilities to enable real-time, high-accuracy inspection. This article explores the common challenges in inspecting reflective and transparent glass, how modern vision systems are solving these issues, the role of Intelgic’s Live Vision in this evolving landscape, and what the future holds for AOI in the glass manufacturing industry.

Common Defects in Reflective and Transparent Glass
Some of the most frequent and problematic defects found in reflective and transparent glass include:
- Scratches: These can be caused during cutting, polishing, or handling and are difficult to detect due to their fine size and directionality.
- Chips or Edge Cracks: Structural imperfections typically found around the borders or corners, impacting both aesthetics and safety.
- Bubbles and Inclusions: Air pockets or embedded particles inside the glass can reduce clarity and strength.
- Distortion or Warp: Irregularities that affect the optical performance, especially critical in applications like touch panels or optical lenses.
- Stains and Coating Defects: Improper coatings or contamination can lead to uneven coloration or reflectivity.
- Surface Contamination: Residual dust, oil, or fingerprint marks are hard to identify without proper lighting and imaging techniques.
These defects can be microscopic or macroscopic, and some may only be visible under certain lighting conditions or from specific angles.
Challenges in Reflective and Transparent Glass Inspection
Glass inspection automation must overcome several challenges:
- Lighting and Glare: Due to reflectivity and transparency, traditional lighting creates glare or reflections that obscure defects.
- Low Contrast Defects: Some flaws, like micro-scratches or thin coating streaks, have minimal contrast and are difficult to detect without specialized lighting.
- Variable Thickness and Surface Curvature: Non-uniform thickness or curved surfaces can distort imaging results.
- Speed vs. Accuracy: High-speed production lines require systems that can inspect without compromising on accuracy or causing bottlenecks.
- Multiple Glass Types and Sizes: Systems must adapt to inspect varying shapes, thicknesses, and coatings without frequent recalibration.
How Area Scan and Line Scan Cameras with Shadowless Lighting Are Transforming Inspection
Modern glass inspection systems utilize area scan and line scan cameras, often combined with shadowless or diffused lighting to overcome inspection limitations.
Area Scan Cameras
Area scan cameras capture a 2D image of the entire field of view in one shot. These are ideal for inspecting stationary or slow-moving glass pieces. They provide high-resolution imaging and are easier to implement in setups with minimal motion.
Benefits:
- Excellent for detecting surface defects like stains or inclusions
- Ideal for flat panel inspections
- Works well with calibrated lighting systems
Line Scan Cameras
Line scan cameras, in contrast, capture images line-by-line as the glass moves across the camera’s field. They are highly suitable for continuous or high-speed production lines.
Benefits:
- Superior resolution for large or moving objects
- Better suited for edge crack or scratch detection
- Allows for seamless scanning of large glass sheets
Shadowless Lighting
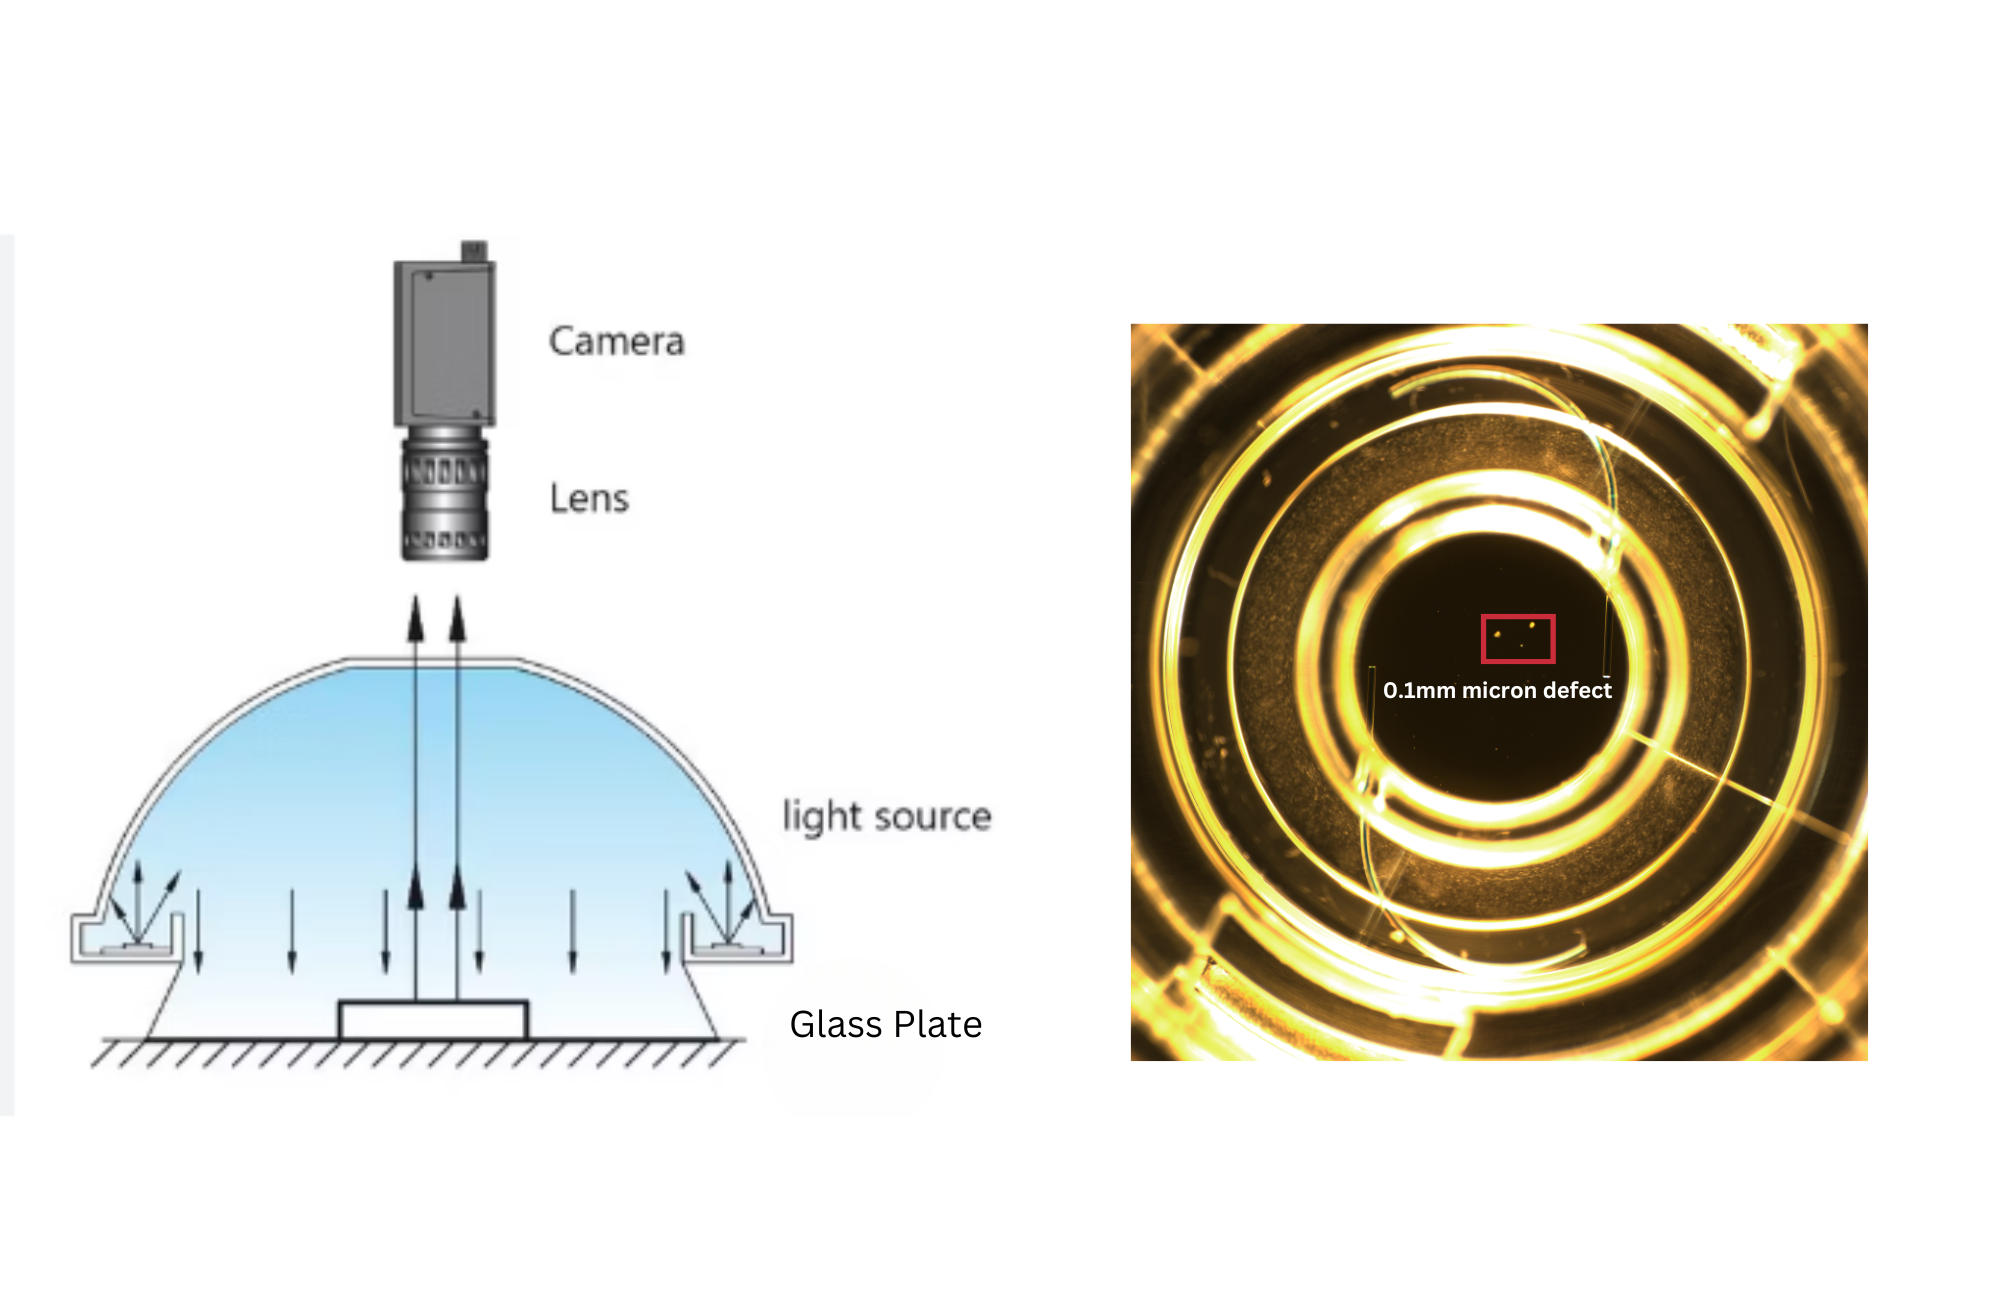
Shadowless or diffused lighting plays a critical role in making subtle defects visible without causing glare. These lighting systems use multiple light sources positioned in a dome or ring configuration, eliminating harsh shadows and highlighting minute surface changes. This is crucial for transparent surfaces where traditional lighting fails.
Combined Impact: By synchronizing camera technology with shadowless lighting, manufacturers can:
- Enhance defect contrast
- Eliminate false positives due to reflections
- Achieve uniform imaging across variable surface textures
- Automate the inspection process for high-volume production

Role of Intelgic’s Live Vision Software in Glass Inspection
Intelgic’s Live Vision software is at the heart of automated glass inspection. It leverages AI, deep learning, and advanced image processing algorithms to detect, classify, and report defects with unmatched accuracy.
Key Features of Live Vision Software in Glass Inspection:
- Real-Time Defect Detection: Live Vision identifies defects such as scratches, chips, and coating issues in real-time, reducing the need for rework and improving production efficiency.
- AI-Powered Classification: The software uses trained neural networks to classify defects into categories—critical, major, or minor—based on user-defined criteria. This supports smarter quality control decisions.
- Adaptive Inspection Models: Live Vision can be trained on specific product variants or coatings, enabling flexible deployment across different production lines.
- Edge AI & Cloud Integration: Live Vision supports both on-premise edge processing and cloud-based analytics, enabling high-speed decision-making and data storage for quality traceability.
- Seamless Hardware Integration: Compatible with various camera systems and lighting configurations, Live Vision easily integrates with area scan and line scan cameras, adapting to diverse production environments.
- Intuitive Dashboard and Reporting: The software provides a visual dashboard for defect monitoring, trend analysis, and reporting. Operators can review captured images, annotate defects, and export QC data.
Workflow of the Inspection Process with Intelgic Live Vision
- Loading & Calibration: Glass sheets or panels are placed on the conveyor. Calibration is performed to adjust lighting, focus, and camera alignment.
- Imaging (Area/Line Scan): Cameras capture the glass surface using area or line scan methods. Shadowless lighting ensures uniform illumination without glare.
- Image Preprocessing: Live Vision performs noise filtering, contrast enhancement, and segmentation to isolate potential defect regions.
- Defect Detection & Classification: AI models analyze defect features—shape, size, location, reflectivity—and classify them using pre-trained data.
- Decision Making: Based on severity, parts are either passed, flagged for rework, or rejected. The system sends signals to sorting mechanisms for action.
- Data Logging & Reporting: All inspection data is logged for traceability, and reports are generated for quality audits.
- Continuous Learning: Feedback loops allow the system to continuously improve detection accuracy by learning from new defect patterns and operator feedback.
Applications Across Key Industries
Reflective and transparent glass is used widely across sectors where precision, durability, and flawless appearance are essential.
Automotive: Inspection of windshields, windows, and mirrors for chips, warping, and coating defects to ensure safety and clarity.
Electronics: Ensures scratch-free display glass for smartphones, tablets, and TVs, including coating and curvature validation.
Architecture: Detects warping, surface flaws, and coating inconsistencies in large glass panels used for façades, windows, and skylights.
Solar: Verifies anti-reflective coatings, detects micro-defects, and maintains surface cleanliness in photovoltaic panel glass.
Optics & Precision Devices: Enables ultra-fine detection of flaws in lenses and transparent components for scientific and medical equipment.
Aerospace & Defense: Validates strength and clarity in cockpit and sensor glass under strict performance and safety standards.
Future Trends of AOI in Reflective and Transparent Glass Inspection
As technology continues to evolve, Automated Optical Inspection (AOI) systems are becoming more intelligent, adaptive, and efficient—especially in the context of reflective and transparent glass inspection. Here are some of the key future trends shaping this space:
Integration of 3D Imaging and Laser Profiling
While current systems primarily rely on 2D imaging, the next generation of AOI will incorporate 3D imaging and laser profiling. These technologies enable precise surface topology analysis and can detect depth-related defects like pits, undulations, or warping—particularly useful for glass with structural applications.
Adoption of Multispectral and Hyperspectral Imaging
AOI systems will increasingly leverage multispectral and hyperspectral imaging to detect invisible flaws, such as micro-coating inconsistencies, delamination, or embedded particles. These technologies analyze beyond visible light, offering deeper insights into both the surface and internal structure of the glass.
Edge AI for Real-Time, Decentralized Processing
Edge computing will play a major role in AOI systems, allowing for faster decision-making at the inspection point without relying on centralized servers. This reduces latency, improves real-time response, and enhances scalability across multiple production lines or facilities.
Cloud-Connected Inspection Ecosystems
Connected AOI systems will enable centralized defect tracking, model sharing, and predictive analytics. This makes it possible to compare quality data across different plants, continuously improve AI models, and predict issues before they arise through global data aggregation.
Self-Learning and Adaptive AI Models
Future AOI platforms will incorporate self-learning algorithms that continuously refine defect detection accuracy by learning from new data. This minimizes the need for constant manual training and allows inspection systems to adapt to product changes, material variations, or seasonal shifts in environmental conditions.
Predictive Maintenance and Quality Forecasting
By monitoring machine behavior and defect trends, AI-powered AOI systems will offer predictive maintenance alerts and quality forecasting. This helps manufacturers take corrective action before issues affect product quality or halt production.
Zero-Touch, Autonomous Inspection Lines
With robotic handling and smart vision systems, the industry is moving toward zero-touch inspection—fully autonomous, closed-loop systems that require minimal human intervention. These systems can inspect, sort, and report defects independently, increasing throughput and consistency.
In an industry where transparency—both literal and figurative—is crucial, Intelgic is redefining how manufacturers inspect reflective and transparent glass. By combining advanced camera technologies with AI-driven analytics in its Live Vision platform, Intelgic delivers precision, speed, and scalability for defect detection. From initial imaging to decision-making, Intelgic’s software ensures that every piece of glass meets the highest quality standards.
As inspection processes move toward complete automation, Intelgic remains at the forefront—enabling smarter factories, reducing manual error, and delivering flawless glass for the modern world.

